How to build an automated bug-predicting bot with zero AI knowledge
Take your app to new heights by integrating MindsDB

In this article, I will tell you about my experience building the glidee-bot and how I came up with the app idea. What problems have I faced along the way? How I overcame those problems and the most important part: How do I leverage MindsDB to integrate AI capabilities into my app without making any effort?
Before diving in to know the nitty-gritty details about how the app works, let us know more about what MindsDB brings to the table and why you should be using it. If you don't know what MindsDB is, you came to the right place because I will be explaining some of MindsDB's important features in detail.
This article is going to be a little bit long but I guarantee you, it will be worth it.
So, grab your coffee and get ready to experience my journey of building the first version of glidee-bot.
What is MindsDB?
As the saying goes, a picture is equivalent to a thousand words.

As you can see in the picture above, mindsDB helps in integrating an AI model into an existing data source. It is an abstraction(or layer) on top of various AI models to help developers build or integrate AI features into their applications.
With MindsDB, developers can focus on core business logic without thinking about how an AI model works under the hood. If you want to add AI capabilities to your application, I highly recommend using MindsDB. After using it myself, I can guarantee that it will help you build and ship your AI features much faster as compared to building an AI model from scratch or using existing services in the market like AWS, Azure, or GCP.
Core features of MindsDB
AI Tables:
A MindsDB AI table is a machine learning model stored as a virtual table inside a database, which allows you to make predictions based on your data.
MindsDB is a tool that enables you to integrate machine learning directly into your database, making it easier to work with AI models and perform predictions on tabular data. Check out this video to understand it more.
Key features of MindsDB AI tables include:
Abstraction: AI tables abstract machine learning models as virtual tables, providing a user-friendly and easily graspable interface for working with AI models.
Flexibility: MindsDB allows you to connect to virtually any data source, including databases, data warehouses, and applications. See the complete list of all supported data sources here.
Integration: AI tables integrate machine learning models directly as virtual tables inside your database, enabling you to create predictors that can be queried with SQL statements.
Simplification: By storing AI models as virtual tables, MindsDB simplifies many operations in the machine learning lifecycle, allowing you to build, train, optimize, and deploy your AI models without the need for other platforms.
Let's see how I created an AI table with a single SQL statement. Although glidee-bot uses MindsDB Javascript SDK to programmatically create an AI table, the SDK also uses SQL API to execute the same query on the MindsDB server. You can also use the MindsDB GUI to create and manage your tables.
CREATE MODEL mindsdb.riskscore_predictor
FROM mongodb_glide (
  test.trainingfiles.find({})
  )
PREDICT riskScore;

SELECT * FROM mindsdb.models
WHERE name='riskscore_predictor'
Let's break down everything that is happening in the above statements:
CREATE MODEL mindsdb.riskscore_predictor: This line creates an AI model(or table) namedriskscore_predictorin a project called asmindsdb.You can see all the tables that you created with the
SELECT * FROM mindsdb.modelsquery mentioned above. To see details about theriskscore_predictor, add theWHEREclause also.FROM mongodb_glide ( test.trainingfiles.find({}) ): This line specifies the data source that you want to connect for MindsDB to use to train the AI model. Heremongodb_glideis the MongoDB database that I created in the MindsDB. You have to create a database source first to create your AI table. I created the database connection using this queryCREATE DATABASE mongodb_glide WITH ENGINE = 'mongodb', PARAMETERS = { "host": "mongodb+srv://yourname:password@clustername.mongodb.net/test?retryWrites=true&w=majority", "port": 27017, "username": "yourname", "password": "password", "database": "test" };You may be thinking that
test.trainingfiles.find({})statement is a MongoDB query, why it is mentioned inside an SQL query? This is one of my favorite features of MindsDB. We can use native queries inside theFROMclause and MindsDB automatically handles all the data fetching right out of the box. It's almost magical.PREDICT riskScore: This line specifies that the machine learning model being created is trained to predict theriskScoreattribute.
What I just explained to you is the tip of the iceberg. In the upcoming sections, I will go deep down into how I implemented these features using the official MindsDB Javascript SDK and how it stopped me from giving up on this project multiple times in my journey.
Let's move to the next big feature to learn how you can use MindsDB Jobs to create sophisticated workflows with just a single SQL statement.
Jobs:
MindsDB Jobs are automated tasks that can be scheduled or triggered in MindsDB, allowing you to automate machine learning workflows and perform predictions on your data at scale.
MindsDB offers various job types, including scheduled jobs, triggered jobs, and continuous jobs, which can be used to automate tasks such as data ingestion, model training, and prediction generation.
I have only used the Javascript SDK in my app to implement all the MindsDB features. Because as of now, the folks at MindsDB are still working on Jobs API in the Javascript SDK. So I have to take a workaround to implement jobs in glidee-bot.
I will talk about this in detail in the 'How does Glidee-bot use a scheduled job to update predicted scores for all files?' section. So for now, let's see how to implement jobs using the MindsDB editor with an example from MindsDB official documentation.
In this example, we will see how MindsDB can save predictions in tables that are created on the fly. You can see the full tutorial here.
CREATE JOB save_predictions (
   CREATE TABLE my_integration.`result_{{START_DATETIME}}` (
      SELECT m.rental_price, m.rental_price_explain
      FROM mindsdb.home_rentals_model AS m
      JOIN example_db.demo_data.home_rentals AS d
   )
)
EVERY hour;
Let's break down what is happening in the above query:
CREATE JOB save_predictions (): This line creates a job with the namesave_predictions.In The braces,
()we define the SQL statements that will be executed by thesave_predictionsjob.CREATE TABLE my_integration.result_{{START_DATETIME}} ()statement creates a table in themy_integrationdatabase. The table name also includes the{{START_DATETIME}}variable that is replaced by the date and time when the job starts its execution. For example-result_2024-01-12 18:45:31can be a table name. This ensures that tables are created with unique names.SELECT m.rental_price, m.rental_price_explainstatement selects therental_priceandrental_price_explainfrommindsdb.home_rentals_modelAI table which is referred to asmhere.JOIN example_db.demo_data.home_rentals AS dthe statement is used to join the results coming frommindsdb.home_rentals_modeltable toexample_db.demo_data.home_rentalstable.
Here,
STARTandENDclauses are omitted. Therefore, the job starts its execution right away and executes every hour until manually disabled.
There are still tons of features available to cover in MindsDB, but that will make this article way too long. You can see all the features available in MindsDB's official documentation.
Now, let's move to the next part of this article in which I will talk about the idea behind Glidee-bot and what Glidee-bot is.
How did I get the inspiration for Glidee-bot?
It was mid-December 2023, when I first heard about MindsDB organizing a hackathon with Hashnode. I have participated in a Hashnode hackathon previously and had a really good time making a project.
Already two weeks had passed by, I thought I wouldn't be able to complete the project on time because I have a full-time job also.
Fortunately, the MindsDB team increased the time limit for submission to January 15, 2024. I let out a sigh and thought, making a good project is doable now.
I started looking for project inspiration. I wanted to solve some real-world problems that people face. While searching for project ideas, I thought why not make something to help me in my daily job?
I was working on some bug fixes at that time. So, I thought it would be a great idea to make a bug-predicting app to help developers in code reviews. I, fortunately, stumbled upon this article on bug prediction, and it led me to the bugspots project.
Bugspot project is based on a Google research paper named "Does Bug Prediction Support Human Developers? Findings From a Google Case Study". You can also read an article from the research team here.
I read the research paper and thought I hit the gold mine. I decided that building a project on an actual problem faced at Google would be a great idea.
I know that you don't have the time to read the whole research paper, so here's a very short summary of the algorithm they used.
The core idea for Glidee-bot
The research team decided to make predictions based on commit history. They considered looking for the number of changes for bug fixes in a particular area of code as the metric to track. In simple words, the higher the bug fixes, the higher the probability of bugs arising.
The algorithm looks at the commit history of a repository. Based on the number of commits for the bug fixes and their recency identifies a bug hotspot, it then arranges them in order of decreasing risk.
How does the algorithm categorize a commit as a bug fix commit?
There are several ways of doing this. The simplest is asking the dev team to always use a #bug for a bug fix in the commit message and a #feat when committing code for any other requirement. As of now, Glidee-bot uses a regex to identify a commit as a bug fix by looking at the commit's message.
The algorithm equipped with the git commit history in a given time frame generates a risk-score for all the files in a repository. Apart from the total number of bugs, the algorithm also takes into account the recency of commits.
In simple words, the weightage of a bug commit decays with time. This means a bug fixed 2 days ago will carry more weight than a bug fixed 20 days ago.
The example below describes why we need the decay in weightage:
Let’s assume we have a code base with two files. File-1 has 30 bug commits but all of them occurred 2 months ago, post which the team refactored the entire file. File-2 has 15 bugs but all in the past week. In case there is no decay, File-1 will keep scoring more on the ‘risk-o-meter’ whereas we all know that is not true in this case.
In the next part, I will explain what Glidee-bot is and how it uses this algorithm to generate real-time risk scores for all the files present in a repository. You can see how I implemented this algorithm in typescript here.
What is Glidee-bot?
Glidee-bot is a GitHub app that helps developers save time and effort while doing code reviews. Glidee-bot provides a curated list of files on each pull request with current and predicted risk scores arranged in order of decreasing risk.
Let's see how glidee-bot works now.
The screenshots below are taken from a demo pull request. You can see the actual comments here. Glidee-bot automatically sorts the files and shows only the top 10 files that need the most attention.

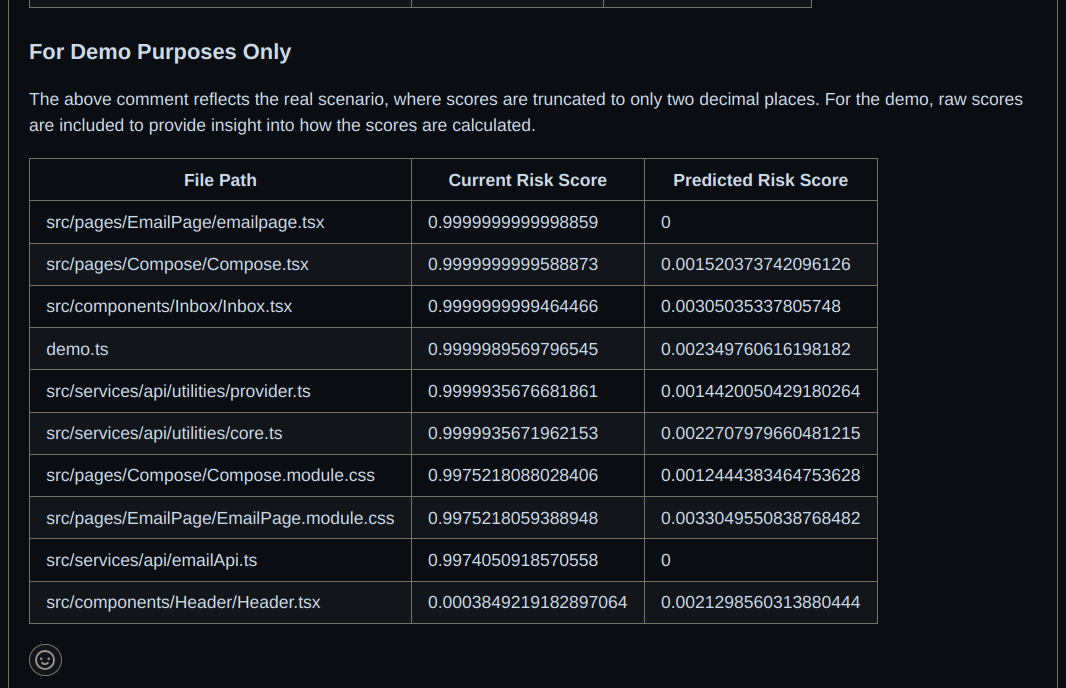
Glidee-bot calculates and updates the risk scores for all the files in real time. The current and predicted risk scores are updated whenever a pull request is closed.

You can see the code for glidee-bot here and to use glidee-bot on your repositories, you can install it from here
See the demo provided below to see Glidee-bot in action!
Features of Glidee-bot
You can see this demo of Glidee-bot to understand its features better
The core features of glidee-bot are:
Glidee-bot can be installed on one or more repositories on GitHub.
Glidee-bot generates a real-time risk score for all the files present on a repository based on a 6-month-old commit history.
After the app installation, you don't have to wait for file processing. Glidee-bot pre-calculates all the risk scores along with predicted risk scores to provide real-time risk analysis of files during a code review.
Glidee-bot automatically filters out non-functional files like
readme.md. It generates a risk score for only files that are closely related to the core business logic of an application.Whenever a pull request is opened on a repository, glidee-bot adds a comment on the discussion thread with the curated list of the top 10 files that are bug-prone to help developers pay more attention to these files.
Whenever a pull request is closed on a repository, glidee-bot updates the current and predicted risk scores for all the files that were modified in that pull request.
Glidee-bot handles file path modifications gracefully. It means you won't lose risk scores for files that are renamed. For eg- if a file named 'home.tsx' has a risk score of 0.25 and you renamed it to 'Home.tsx' then the associated risk scores would be transferred to the new file path, which means 'Home.tsx' is now having a risk score of 0.25.
How Glidee-bot works?

Let's understand the whole workflow with the steps mentioned in the above architecture diagram:
Step 1: Sending webhook events to Hookdeck
GitHub sends webhook events to HookDeck(event gateway) and then Hookdeck relays them to glidee-bot in step 2.
HookDeck helps in making glidee-bot more reliable as it also works as a message queue. If you don't understand what a message queue is, then you can read more about event-driven architecture here.
HookDeck provides features like:
Event Retries: As of now, I wanted to integrate this feature badly because glidee-bot is deployed on a t2.large instance on AWS along with MindsDB. Although, the resources are enough to process a few repositories parallelly. However, the app won't be able to handle the processing of a large number of files concurrently and is prone to crashing while processing files. So, it's important to have an event retry mechanism to make sure all the events are processed and the app is not missing any event.
Local troubleshooting: Hookdeck provides a CLI that helps in forwarding all the events to a local HTTP server.
Logging and audit trail: Hookdeck's logging features allow you to inspect properties like status (success or failure), time of delivery, webhook source, headers in the requests, data contained in the payload, and many more.

The above picture shows how Hookdeck routes all the events received from GitHub to the prod and dev instances.
Step 2: Relaying webhook events to glidee-bot app
Upon receiving the webhook events from GitHub, Hookdeck relays all the events to the glidee-bot. In case, the glidee-bot is down for some reason, events will start to queue up in Hookdeck. After glidee-bot scales up again, Hookdeck will replay all the missed events automatically.
Step 3: Event processing
Here comes the interesting part. How does glidee-bot handle all the webhook events received from Hookdeck?
Probot comes into the picture here. Glidee-bot is built with the Probot framework.
Probot is a framework for building GitHub Apps in Node.js. It aims to eliminate all the drudgery–like receiving and validating webhooks and doing authentication handstands–so you can focus on the features you want to build.
Let's see how the function that handles all the event routing to different modules in the app works. See the full code for the main.ts here.
export async function main(probotApp: Probot) {
  try {
    connectMongoDB().catch((error: any) => app.log.error(error));
    connectMindsDB().catch((error: any) => app.log.error(error));
    handleAppInstallationCreatedEvents(probotApp);
    handlePullRequestOpenEvents(probotApp);
    handlePullRequestClosedEvents(probotApp);
    trainPredictorModel();
    predictedScoresUpdationScheduler();
  } catch (error: any) {
    app.log.error("Error occured in main function");
    app.log.error(error);
  }
}
There are a lot of things going on in the above snippet. Let's break them down.
connectMongoDB() and connectMindsDB() are present for creating the database connection to MongoDB and MindsDB respectively.
handleAppInstallationCreatedEvents() function handles the app_installation.created webhook event coming from GitHub. This event is sent when an app is installed on one or more repositories. Read more about the installation webhook event here.
handleAppInstallationCreatedEvents() function further calls the processRepositories() function, which is responsible for processing all the files and finally saving them in the MongoDB and MindsDB databases (see the diagram above).
Let's take a look at the data models that are used in the app before going forward.
const FileSchema = new Schema({
  installationId: { type: Number, required: true },
  owner: { type: String, required: true },
  repoName: { type: String, required: true },
  filePath: { type: String, required: true },
  commits: { type: [Commit], required: true },
  riskScore: { type: Number, required: true },
  predictedRiskScore: { type: Number, required: false },
  createdAt: { type: Date, default: new Date() },
  updatedAt: { type: Date, default: new Date() },
});

export const Commit = new Schema({
  sha: { type: String, required: true },
  message: { type: String, required: true },
  date: { type: Date, required: true },
});

export const File = model("repoFile", FileSchema);

const TrainingFileSchema = new Schema({
  installationId: { type: Number, required: true },
  owner: { type: String, required: true },
  repoName: { type: String, required: true },
  filePath: { type: String, required: true },
  numberOfCommits: { type: Number, required: true },
  riskScore: { type: Number, required: true },
  createdAt: { type: Date, default: new Date().toLocaleString() },
  updatedAt: { type: Date, default: new Date().toLocaleString() },
});

export const TrainingFile = model("trainingFile", TrainingFileSchema);
Both the File and TrainingFile models are saved in MongoDB. But MindsDB uses the trainingfiles collection as the data source to predict the risk scores.
Repositories are processed in batches and after processing all the repositories present in the installation.created event payload, the retrainPredictorModel() function is called finally.
To keep this article short, I won't be explaining how the pull request events are handled. You can see the full code for the handlePullRequestOpenEvent() function and handlePullRequestClosed() here. I have added helpful comments in the code about the implementation. So, I think you will be able to understand the code pretty easily.
I will explain how the trainPredictorModel() and the predictedScoresUpdationScheduler() functions work in upcoming sections.
Now, let's move to the next step
Step 4: How does the app construct the comment for GitHub?
In the previous step, the app had already saved the files in MongoDB, and with the help of a scheduled job(more details in the upcoming section), all the predicted scores are updated in the MongoDB documents.
Now, after receiving a pull_request.opened or a pull_request.closed webhook event, the app will be constructing a comment to add to the pull request discussion thread.
You can see how the app constructs a markdown comment here in this file
Step 5: End of workflow
In the final step, the app will add the comment to the pull request discussion thread and the workflow reaches the terminal stage.
How Glidee-bot uses MindsDB SDK?
In this section, we will see how you can use MindsDB Javascript SDK to implement the exact features that are present in the GUI programmatically. See the complete code here in this file.
Let's see how to connect to a local MindsDB instance running locally.
How to connect to the local server using MindsDB SDK?
export async function connectMindsDB() {
  return new Promise(async (resolve, reject) => {
    try {
      await MindsDB.connect({
        user: "",
        password: "",
        host: "http://127.0.0.1:47334",
      });

      resolve(MindsDB);
    } catch (error: any) {
      app.log.error("Error while connecting to mindsdb");
      reject(error);
    }
  });
}
For connecting to a local instance, you don't need to provide credentials to the MindsDB server. Just pass an empty string in both the user and password fields.
Now, let's see how to create a database in MindsDB.
How to create the database in the server using MindsDB SDK?
async function createDatabase(app: Probot): Promise<Database | undefined> {
  if (
    MONGODB_USER === undefined ||
    MONGODB_PASSWORD === undefined ||
    MONGODB_PORT === undefined ||
    MONGODB_CONNECTION_STRING === undefined ||
    MONGODB_DATABASE === undefined
  ) {
    app.log.error(
      `MindsDB environment values are undefined: DB:${MONGODB_DATABASE}, USER:${MONGODB_USER}, PASSWORD: ${MONGODB_PASSWORD}, PORT: ${MONGODB_PORT}, HOST: ${MONGODB_CONNECTION_STRING}`
    );
    return;
  }

  const connectionParams: Record<string, JsonValue> = {
    username: MONGODB_USER,
    password: MONGODB_PASSWORD,
    port: MONGODB_PORT,
    host: MONGODB_CONNECTION_STRING,
    database: MONGODB_DATABASE,
  };

  try {
    const mongoDB: Database = await MindsDB.Databases.createDatabase(
      databaseName,
      "mongodb",
      connectionParams
    );

    return mongoDB;
  } catch (error: any) {
    app.log.error("Error while creating database in mindsdb");
    throw error;
  }
}
You need to create a database first in the MindsDB before executing any other query. After the database creation, we can move to create an AI table just as we have seen in the previous section on how to create an AI model using the MindsDB GUI.
How to create/train the predictor model in the server using MindsDB SDK?
const databaseName = `mongo_datasource`;
const projectName = `mindsdb`;
const predictorName = `riskscore_predictor`;
const targetField = `riskScore`;
const aggregationQuery = `test.trainingfiles.find({})`;

const regressionTrainingOptions: TrainingOptions = {
  select: aggregationQuery,
  integration: databaseName,
  groupBy: "installationId",
  window: 100, // How many rows in the past to use when making a future prediction.
  horizon: 10, // How many rows in the future to forecast.
};

export async function trainPredictorModel() {
  try {
    const models: Model[] = await MindsDB.Models.getAllModels(projectName);
    const modelNames = models.map((model: Model) => model.name);

    if (modelNames.includes(predictorName)) {
      app.log.info(`[${predictorName}] model is already present in mindsdb`);
      return;
    }
    app.log.info(`Started training the model: [${predictorName}]`);
    const dbList: Database[] = await MindsDB.Databases.getAllDatabases();
    const dbNames: string[] = dbList.map((db: Database) => db.name);

    if (!dbNames.includes(databaseName)) {
      const db: Database | undefined = await createDatabase(app);
      app.log.info(`Created database: ${db?.name} in mindsdb successfully`);
    }

    let predictionModel: Model | undefined = await MindsDB.Models.trainModel(
      predictorName,
      targetField,
      projectName,
      regressionTrainingOptions
    );

    const intervalId = setInterval(async () => {
      predictionModel = await MindsDB.Models.getModel(
        predictorName,
        projectName
      );

      if (!predictionModel?.status.match("error")) {
        app.log.info("Prediction model training is complete");
        clearInterval(intervalId);
      }
    }, 2000);

    app.log.info(`training completed for [${predictorName}]`);
  } catch (error: any) {
    app.log.error("Error while training the model");
    app.log.error(error);
  }
}
How to retrain the predictor model using MindsDB SDK?
export async function retrainPredictorModel(app: Probot) {
  await MindsDB.Models.retrainModel(
    predictorName,
    targetField,
    projectName,
    regressionTrainingOptions
  )
    .then(() => {
      app.log.info(`Started [${predictorName}] model retraining successfully`);
    })
    .catch((error: any) => {
      app.log.error(
        `Error occurred while retraining the model [${predictorName}]`
      );
      app.log.error(error);
    });
}
How to query the server using MindsDB SDK?
export async function queryMindDB(app: Probot, model: Model, job: Job) {
  try {
    const queryOptions: QueryOptions = {
      where: [
        `installationId=${job.parameters.installationId}`,
        `owner="${job.parameters.owner}"`,
        `repoName="${job.parameters.repoName}"`,
        `filePath="${job.parameters.filePath}"`,
      ],
    };
    const response: ModelPrediction | undefined = await model.query(
      queryOptions
    );
    if (response === undefined) {
      throw new Error("response is undefined");
    }
    const data: any = response.data;
    const file: FileType = {
      installationId: data.installationid,
      owner: data.owner,
      repoName: data.reponame,
      filePath: data.filepath,
      commits: [], // won't update
      riskScore: data.riskscore_original, // won't update
      predictedRiskScore: data.riskscore,
    };

    return file;
  } catch (error: any) {
    app.log.error(`Error while querying the predictor model: ${error.message}`);
    throw error;
  }
}
How to batch query the server using the MindsDB SDK?
const joinQuery = `mongo_datasource.trainingfiles`;
const mindsdbBatchQuerySize = 10;

export async function batchQueryMindDB(
  app: Probot,
  installationId: number
): Promise<FileType[]> {
  return pollPredictorModelStatus()
    .then(async (model: Model | undefined) => {
      const queryOptions: BatchQueryOptions = {
        join: joinQuery,
        where: [`t.installationId=${installationId}`],
        limit: mindsdbBatchQuerySize,
      };
      const response: ModelPrediction[] | undefined = await model?.batchQuery(
        queryOptions
      );
      if (response === undefined) {
        throw new Error(`response is undefined`);
      }
      const files: FileType[] = response.map((obj: ModelPrediction) => {
        const data: any = obj.data;
        return {
          installationId: data.installationid,
          owner: data.owner,
          repoName: data.reponame,
          filePath: data.filepath,
          commits: [],
          riskScore: data.riskscore_original,
          predictedRiskScore: data.predicted,
        };
      });

      return files;
    })
    .catch((error: any) => {
      app.log.error(
        `Error while polling the predictor model status: ${error.message}`
      );
      throw error;
    });
}
I have almost covered all the current features that are present in the SDK. In the next part, we will see how you can predicted scores are automatically updated in the repofiles collections in MongoDB.
How does Glidee-bot use a scheduled job to update predicted scores for all files?
We can finally talk about how I implemented a workaround to use scheduled jobs because the Jobs API for javascript SDK is still not available yet. You can check the status of API here, in case at the time you are reading this article, it becomes available to use.
If you see the third step in the architecture diagram above, along with saving files in MongoDB and MindsDB, the app also saves some jobs in the MongoDB database. It was not mentioned to keep things simple.
The main purpose of using a scheduler is to decouple the main app from the MindsDB server. It is important to decouple the predicted risk score updation process because the predictor model takes some time to finish the training and retraining.
The app cannot wait for the predictor model's training to finish to construct the final comment to add on GitHub. So, to maintain performance, it is important to update the predicted risk scores separately.
Let's see the job model first to understand how the scheduler picks the jobs to perform.
export enum JobStatus {
  Complete = "complete",
  Incomplete = "incomplete",
}

export enum JobName {
  InstallationJob = "app-installation-job",
  FileUpdationJob = "file-updation-job",
}

interface Job {
  jobName: JobName;
  parameters: Record<string, any>;
  status: JobStatus.Complete | JobStatus.Incomplete;
  scheduledAt: Date;
  completedAt?: Date;
}

const jobSchema = new Schema<Job & Document>({
  jobName: { type: String, required: true },
  parameters: { type: Schema.Types.Mixed, required: true },
  status: { type: String, enum: JobStatus, required: true },
  scheduledAt: { type: Date, required: true },
  completedAt: { type: Date, required: false },
});

export const JobModel = model<Job & Document>("job", jobSchema);
The scheduler picks the jobs with 'incomplete' status. Currently, the scheduler performs two jobs:
Installation Job: This job is created when an app is installed on one or more repositories for the first time. Since the files are newly added, they won't have any predicted risk scores associated with them. The scheduler picks up the predicted risk scores from the MindsDB server and updates them in the files collection in MongoDB.
File updation Job: This job is created when a pull request is closed. Whenever a pull request is closed, the app recalculates the risk scores again and triggers the predictor model to retrain. After the retraining is complete, the scheduler picks up the new predicted risk scores from the MindsDB server and updates them in the files collection in MongoDB.
You can see the whole code on how the scheduler works here
Performance and monitoring
Let's talk performance now.
Although Glidee-bot processes repositories in batches and uses asynchronous processes wherever it is possible, it is still hard to avoid all bottlenecks in the performance.
I have conducted a few high-volume tests after deploying the app on a t2.large instance on AWS. You can see the CPU utilization graph here for p99 statistics for 1 week's data.
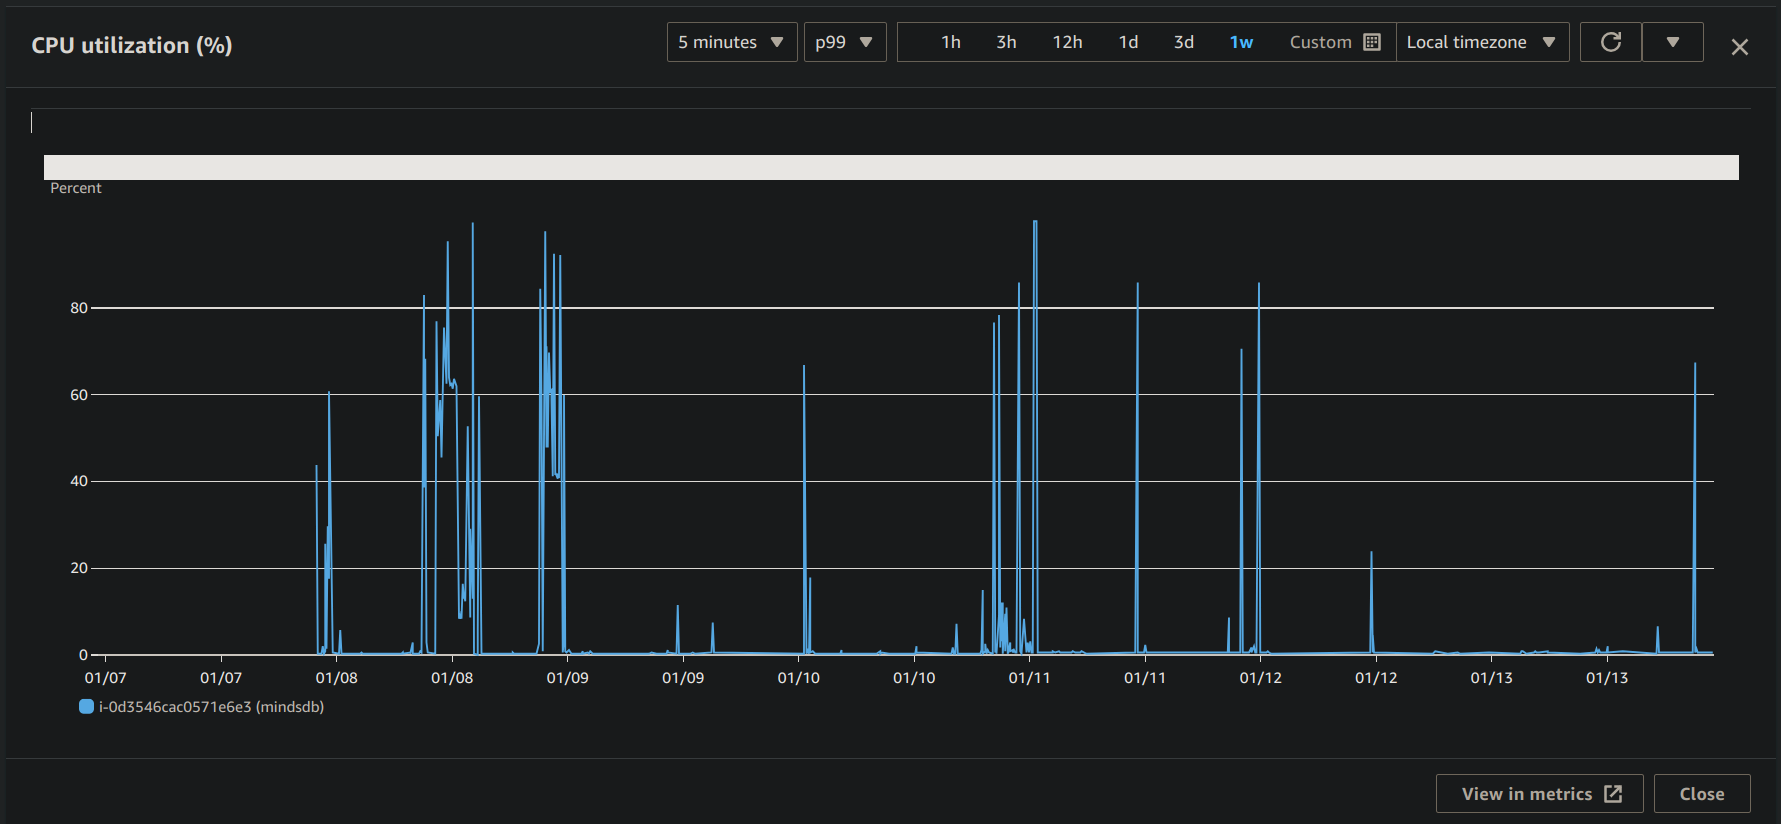
I think the performance is not that bad considering that the MindsDB server is also present in the same instance.
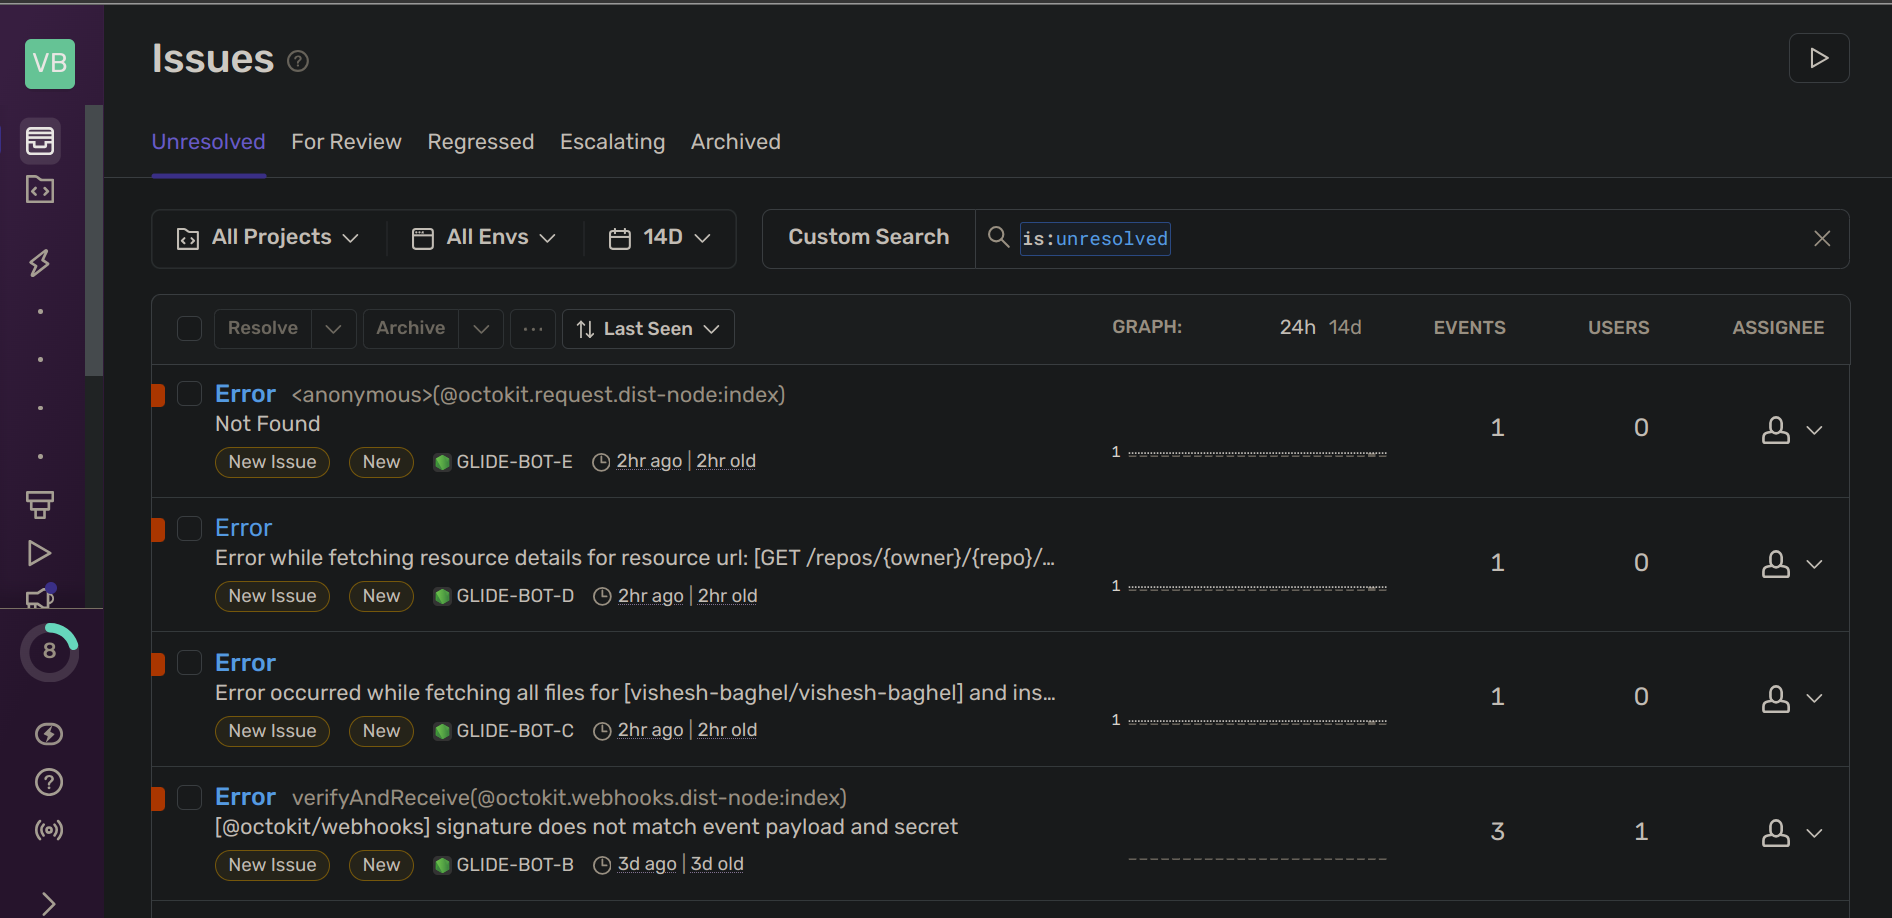
I use Sentry to monitor issues in production. Sentry comes along with Probot, so you don't have to add any extra code to integrate the monitoring systems in your app. You can see how all errors are displayed in a nice dashboard whenever something bad happens in the production app.
Conclusion
Thanks for reading until the end. This article got stretched a little but I think it was worth it because I still have a lot to share with you about the features and design decisions that I took during the development. I held back a lot!
I faced a lot of challenges and thought of giving up on continuing the project but still, I somehow completed a working version. If you want to look at what problems I faced during the development, you can see the list of closed issues on the glide-bot repository.
I tried to document the whole journey by adding comments on the issues whenever possible. There is one more reason I made issues on GitHub for all the features and bug fixes in the glidee-bot project.
I want to continue this project even after the end of this hackathon!
I feel I can make this project go to the next level if I add more AI features to it. MindsDB already provides plenty of features to work with. The possibilities are endless.
If you also want to contribute to the project, feel free to raise a PR on the glidee-bot repository.
Or if you want to make something on your own using MindsDB, check out this community tutorials list to see if you can build something exciting.
Do share your projects with others by writing an article like this one. I use Hashnode to share my writings. It's free and easy to use. The community here shares a lot of valuable articles on various topics related to software engineering.
Once again, thanks for reading until the end. Let's meet again in the next article.
Happy coding!
